
Intro
Optimize Epson vinyl settings with 5 expert tips, ensuring precise cuts and vibrant prints. Master vinyl crafting, signage, and decals with tailored settings and techniques.
Epson printers are widely used for various printing tasks, including vinyl printing, which has become increasingly popular for creating custom signs, decals, and other decorative items. To achieve the best results with Epson vinyl settings, it's essential to understand the key factors that influence the printing process. In this article, we will delve into the world of Epson vinyl printing, exploring the importance of proper settings and providing valuable tips to enhance your printing experience.
The quality of your prints largely depends on the settings you use, and Epson vinyl settings are no exception. Whether you're a beginner or an experienced printer, optimizing your settings can make a significant difference in the final output. From choosing the right paper type to adjusting the print quality, every detail counts. In the following sections, we will discuss the top 5 tips for Epson vinyl settings, covering topics such as paper type, print quality, cutter settings, and more.
Understanding Epson Vinyl Settings

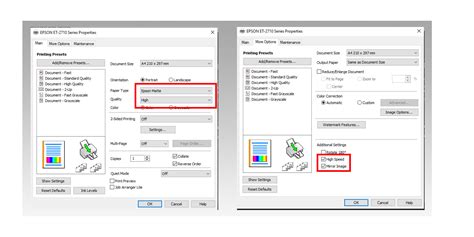
Tip 1: Choose the Right Paper Type

Benefits of Choosing the Right Paper Type
Choosing the right paper type can have a significant impact on the quality of your prints. Some of the benefits of selecting the correct paper type include: * Improved print quality: By choosing the correct paper type, you can ensure that your prints are crisp, clear, and vibrant. * Increased durability: The right paper type can help extend the life of your prints, making them more resistant to fading, cracking, and other forms of damage. * Better adhesion: The correct paper type can improve the adhesion of the vinyl to the printing surface, reducing the risk of peeling or lifting.Tip 2: Adjust the Print Quality

Print Quality Settings
Epson printers offer the following print quality settings: * Draft: This setting is suitable for basic prints and is the fastest option. * Standard: This setting is suitable for most printing tasks and offers a good balance between quality and speed. * High-quality: This setting is suitable for complex designs and offers the highest level of detail and resolution. * Photo: This setting is suitable for printing photos and offers the highest level of color accuracy and detail.Tip 3: Optimize Cutter Settings
Cutter Settings Options
Epson printers offer the following cutter settings options: * Cut: This setting cuts the vinyl along the edge of the design. * Cut+bleed: This setting cuts the vinyl along the edge of the design and includes a small bleed area. * Cut+bleed+transfer: This setting cuts the vinyl along the edge of the design, includes a small bleed area, and applies a transfer tape to the top of the vinyl.Tip 4: Use the Right Ink Settings

Ink Settings Options
Epson printers offer the following ink settings options: * Standard: This setting uses the standard amount of ink for printing. * Vivid: This setting uses more ink to produce brighter, more vibrant colors. * Custom: This setting allows you to adjust the amount of ink used for printing to suit your specific needs.Tip 5: Calibrate Your Printer
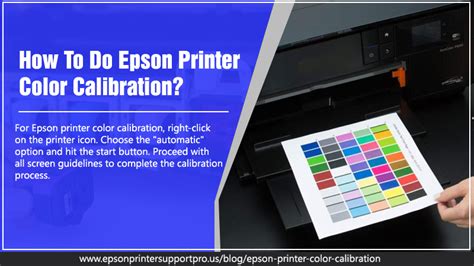
Calibration Options
Epson printers offer the following calibration options: * Automatic calibration: This option uses the printer's built-in calibration system to adjust the settings. * Manual calibration: This option allows you to manually adjust the settings to suit your specific needs.Epson Vinyl Image Gallery


What is the best paper type for Epson vinyl printing?
+The best paper type for Epson vinyl printing is the "Vinyl" option, as this will ensure that your printer is configured to produce the best results for vinyl printing.
How do I adjust the print quality on my Epson printer?
+To adjust the print quality on your Epson printer, go to the printer settings and select the desired print quality option, such as draft, standard, or high-quality.
What is the difference between cut, cut+bleed, and cut+bleed+transfer cutter settings?
+The cut setting cuts the vinyl along the edge of the design, the cut+bleed setting cuts the vinyl along the edge of the design and includes a small bleed area, and the cut+bleed+transfer setting cuts the vinyl along the edge of the design, includes a small bleed area, and applies a transfer tape to the top of the vinyl.
How do I calibrate my Epson printer for vinyl printing?
+To calibrate your Epson printer for vinyl printing, go to the printer settings and select the calibration option, then follow the on-screen instructions to complete the calibration process.
What are the benefits of using the right ink settings for Epson vinyl printing?
+The benefits of using the right ink settings for Epson vinyl printing include improved print quality, increased durability, and better adhesion of the vinyl to the printing surface.
In conclusion, optimizing your Epson vinyl settings is crucial for achieving professional-looking results. By following the 5 tips outlined in this article, you can improve the quality of your prints, increase durability, and enhance the overall appearance of your designs. Remember to choose the right paper type, adjust the print quality, optimize cutter settings, use the right ink settings, and calibrate your printer to ensure that you're getting the best possible results from your Epson printer. With practice and patience, you'll be able to master the art of Epson vinyl printing and create stunning designs that will impress your clients and friends. So, don't hesitate to experiment with different settings and techniques to find what works best for you. Share your experiences and tips with others, and don't forget to comment below with any questions or feedback you may have. Happy printing!