
Intro
Create professional mailings with our A9 Envelope Size InDesign template, featuring precise dimensions and layouts for seamless printing, including address labels and postage spaces, ideal for invitations, announcements, and direct mail marketing campaigns.
The A9 envelope size is a popular choice for sending invitations, greeting cards, and other small mailings. In the world of graphic design, having a template can save time and ensure accuracy. When it comes to creating an A9 envelope template in InDesign, there are several things to consider. In this article, we will delve into the world of envelope design, explore the benefits of using a template, and provide a step-by-step guide on how to create an A9 envelope template in InDesign.
The importance of having a well-designed envelope cannot be overstated. It is often the first thing that the recipient sees, and it can set the tone for the entire mailing. A well-designed envelope can make a lasting impression, while a poorly designed one can be easily overlooked. With the rise of digital communication, physical mailings have become a unique way to connect with others. Whether it's a wedding invitation, a birthday card, or a business letter, a beautifully designed envelope can make all the difference.
In recent years, there has been a resurgence of interest in traditional mailings. With the help of design software like InDesign, creating professional-looking envelopes has become easier than ever. InDesign offers a wide range of tools and features that make it easy to design and print envelopes. From custom shapes and sizes to advanced typography and color control, InDesign has everything you need to create stunning envelopes. Whether you're a seasoned designer or just starting out, InDesign is the perfect choice for creating A9 envelope templates.
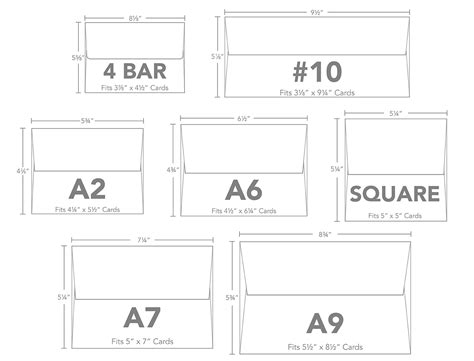
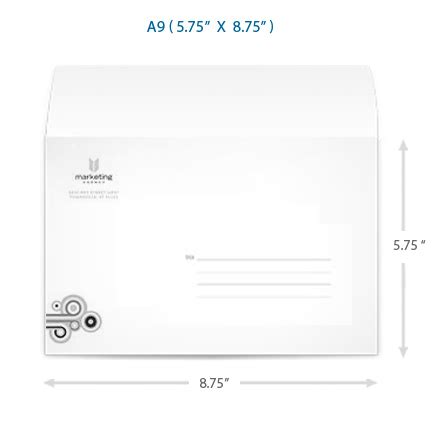
A9 Envelope Size and Specifications
Benefits of Using an A9 Envelope Template

Step-by-Step Guide to Creating an A9 Envelope Template in InDesign
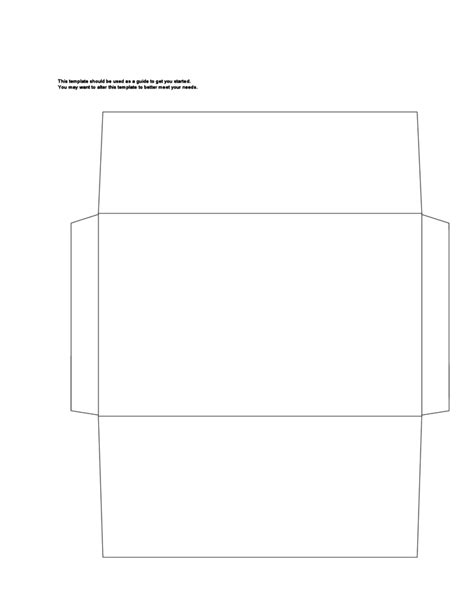
Creating an A9 envelope template in InDesign is a straightforward process. Here's a step-by-step guide to get you started: * Open InDesign and create a new document. Set the size to 5.75 x 8.75 inches, and set the orientation to landscape. * Create a new layer for the envelope design. This will help you keep your design elements organized and make it easier to edit your template later. * Use the rectangle tool to draw the envelope shape. Make sure to set the corner radius to 0, so that the corners are square. * Add a square flap to the envelope. You can use the polygon tool to draw the flap, or you can use a pre-made shape from the InDesign library. * Add an address window to the envelope. You can use a rectangle or a rounded rectangle, depending on the style you prefer. * Add any other design elements you want to include, such as text, images, or graphics.Designing Your A9 Envelope Template
Some popular design elements for A9 envelopes include:
- Custom illustrations or graphics
- Bold typography and bright colors
- Textures and patterns
- Photos or other images
- Die-cut shapes and custom shapes
Tips and Tricks for Creating a Professional-Looking A9 Envelope Template
Here are some tips and tricks for creating a professional-looking A9 envelope template: * Use high-quality images and graphics to ensure that your design looks sharp and clear. * Choose a font that is easy to read and looks professional. * Keep your design simple and uncluttered. Too many design elements can make your envelope look busy and confusing. * Use color effectively. A bold color scheme can make your envelope stand out, but it's also important to consider the overall aesthetic you want to achieve. * Make sure to proofread your design carefully before printing. A single typo or mistake can make your envelope look unprofessional.A9 Envelope Template Examples

Common Mistakes to Avoid When Creating an A9 Envelope Template
Here are some common mistakes to avoid when creating an A9 envelope template: * Not leaving enough space for the address and other information * Using low-quality images or graphics * Choosing a font that is difficult to read * Overcrowding the design with too many elements * Not proofreading the design carefully before printingGallery of A9 Envelope Templates
A9 Envelope Templates Image Gallery


What is the size of an A9 envelope?
+The size of an A9 envelope is 5.75 x 8.75 inches.
How do I create an A9 envelope template in InDesign?
+To create an A9 envelope template in InDesign, open a new document and set the size to 5.75 x 8.75 inches. Then, use the rectangle tool to draw the envelope shape and add any design elements you want to include.
What are some common mistakes to avoid when creating an A9 envelope template?
+Some common mistakes to avoid when creating an A9 envelope template include not leaving enough space for the address and other information, using low-quality images or graphics, and overcrowding the design with too many elements.
How do I print an A9 envelope template?
+To print an A9 envelope template, simply export the design as a PDF and print it on your preferred paper or cardstock. Make sure to adjust the print settings to ensure that the design is centered and aligned properly.
Can I use an A9 envelope template for digital mailings?
+No, an A9 envelope template is designed for physical mailings only. If you need to create a digital mailing, you will need to use a different template or design.
In conclusion, creating an A9 envelope template in InDesign is a straightforward process that can save time and ensure accuracy. By following the steps outlined in this article and avoiding common mistakes, you can create a professional-looking envelope that makes a lasting impression. Whether you're a seasoned designer or just starting out, InDesign is the perfect choice for creating stunning envelopes. So why not give it a try and see what you can create? Share your designs with us and let's get inspired together!